
kiddi
By Kerri Caughill
If you’re looking for DIY gift ideas for your dog this holiday season, and if you—like most people—have amassed a few too many items of clothing over the years, then I’ve got a perfect project for you.
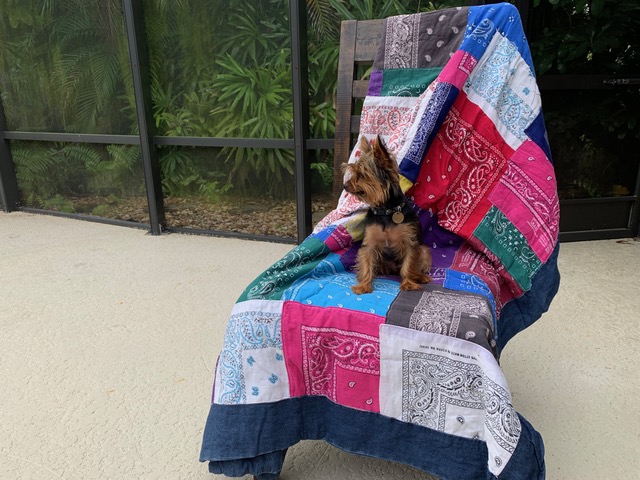
Making a DIY t-shirt quilt is a great way to do something special for your four-legged friend while clearing out your closet. Pets love their owners’ scents, and if your dog is anything like my Yorkie, Max, your scent may help reduce separation anxiety during the night or times when they’re home alone.
So, why not make something of those old sweaters or t-shirts you’ve got laying around the house? It’s easier than you’d think, even if you’ve never sewn before, and all you need are a few basic tools you can get at the craft store or borrow from friends.
Let’s begin!
Gather your supplies
You probably already have most of these tools at home, and others, such as backing fabric can be bought for cheap online or at your local craft store. If you don’t have a sewing machine, ask around to see if a friend or family member will loan you theirs. It may even be a conversation starter for you and Grandma this Christmas!
Equipment & Tools
- Measuring tape
- Iron and ironing board
- Scissors
- Rotary cutting tools (optional)
- Pins
- Sewing machine
Materials
- Any old T-shirts or clothing you want to repurpose
- Coordinating fabric (optional)
- Lightweight fusible interfacing
- Matching thread
- Batting
- Backing fabric
- Matching quilt binding (if using)
Instructions
Make a plan
Before you begin, take a look at your t-shirts (or in my case, bandanas) and create a plan for your quilt. The following questions may help you create a plan.
- What size do you want the quilt to be?
- Do you have enough material for the desired size, or do you need additional fabric to fill in the gaps? (Tip: Factor in 2.5cm to 4cm for seam allowance and trimming unfused edges)
- Will all the quilt panels be cut to the same size or will they vary in size? (Tip: Same-sized panels may be easier for beginners.)
Cut the t-shirts
Before you begin, ensure the t-shirts are washed, dried and wrinkle-free. This is really important, so don’t skip this step.
Begin cutting out the front and back panels of each shirt. Using a sharp pair of sewing scissors, cut along the side seams. Continue to cut below the sleeve seam and discard the sleeves. Cut along the neck band and also along the bottom of the shirt to remove the hemmed parts. You should be left with two rectangular panels for each shirt.
Use the same process for the remaining shirts.
Lay out the design
This step is the fun part where there are no rules. Be creative as you want!
Lay out your design on a large, flat surface like a table or the floor. Rearrange the t-shirt panels until you come up with a design you like. You can keep it simple by keeping the large rectangle shapes or you can cut some into smaller pieces like I did on my bandana quilt.
If you are using coordinating fabric, you’ll want to cut it out and add it to the design at this time.
Take note of the design or take a picture for reference later.
Trim panels to fit design
Trim your t-shirt panels according to your design. Again, remember to leave a 1.3cm seam allowance plus about 2.5cm extra that will be trimmed after the fusible interfacing is adhered. By cutting off the edges, the fabric will have tightly fused edges. Although not necessary, a rotary cutter will make this part a bit easier and faster.
If you are keeping all the panels the same size, it’s a good idea to measure and cut one panel and then use it as a pattern for the other panels.
Fuse the interfacing
Although not absolutely necessary, using interfacing will add some stiffness to the t-shirt fabric and keep the material from stretching out of shape.
Follow the manufacturer’s instructions to adhere the interfacing to the back of each t-shirt panel. Check that the interfacing and fabric is fused together. Once all the panels are fused, trim off the edges that are not fused and cut to your desired size (leaving about a 1.3cm seam allowance on each edge).
Pin & sew pieces together
Pin the right sides (the printed or pretty sides of the fabric) of the t-shirt panels and any additional fabric together, leaving enough room for a 1.3cm seam allowance. Pin all the panels together to make one row.
Once the panels are pinned together, it’s time to sew them. Use a 1.3cm seam allowance to sew the panels together. If you’re unsure of how to begin, the Youtube is full of helpful guides.
Once all the rows are completed, sew the rows together, once again, using a 1.3cm seam allowance, matching seam intersections if desired.
With a warm iron, press the seam allowances open.
At this time, you should have all the panels sewn together to make the front of the quilt.
Add the batting and backing
Measure and cut the batting and backing fabric to fit the top layer of your quilt.
The method I’m about to show you is not typically used for a quilt, but it is easier for beginners and a lot faster. If you prefer the authentic quilt method, search for “binding a quilt” on the internet for instructions.
On a flat surface, layer the fabrics in this order starting from the bottom. 1. Front of the quilt piece, right side up. 2. Backing fabric piece (bottom of quilt), wrong side up. 3. Batting should be on top. Pin into place.
The quilt will look like it’s inside out at this point, and, in fact, it is. You’ll be turning it the correct way before stitching the quilt closed.
Sew the layers together starting at a corner and working your way around the edge, until you reach the final side. Sew along the last side until you get about 46cm from the corner where you began. Turn the quilt right side out. Fold in the raw edges of the remaining 46cm of fabric as evenly and as straight as possible. Pin into place. Press with iron if needed to get fabric to stay folded inward. Sew along the edge to close the open seam.
Add the final detail
Now you get to add the final detail stitching. Lay out the quilt flat and smooth out the wrinkles evenly.
Pin all the layers of the quilt together along the seams. The pins will keep the batting and backing fabric in place as your sew through the layers.
Begin at the center of the quilt. Using the stitch pattern of your choice, sew along the rows and columns of your quilt panels. Continue sewing along seams until they are all completed.
The fabric will be thick, so take your time and let the machine do the work.
Congratulations! You did it! Wrap it and give it to your dog as a gift. You can use it to line their crate, lay it over their favorite couch cushion, or they can drag it around the house. No matter what, I’m sure they’ll thank you in their own way.
Tips & Tricks
- Don’t overthink it. Just have fun! Your pup won’t mind if you mess up.
- Approximately 16 t-shirts will make a throw-sized blanket.
- If you are new to sewing, practice on some fabric scraps before trying it on your quilt
- Practice and play with the final quilt stitch designs to see what you like. Youtube is your friend when finding new patterns.
- A ballpoint needle may be helpful as it’s especially designed for knit fabrics. A regular needle may result in skipped stitches and fabric damage, causing the fabric to curl.
Kerri Caughill is a mom and the Co-founder of The Dog Tale. She’s obsessed with finding healthy, natural products for her family without any nasty chemicals or byproducts. When she’s not inside with Max and a MacBook vying for position on her lap, she’s outside enjoying the sunshine with a furry companion.


